Showing posts with label Backsplash. Show all posts

Tuesday, December 31, 2013

FWF's Year Review - 2013

What a difference a year makes.  This has been a huge year for Fisherman's Wife Furniture and for me personally.  This marks one full year out of the classroom and being a full time business owner.  Somedays I still can't believe it and I am waiting for someone to come take it all away.

Over the past few months, many new followers and readers have come along so I want to do a quick review of my favorite and/or most popular posts from 2013.


Favorite Personal Posts


We started the year off right with a great vacation!  The past two years we have done a January vacation to The Out Islands of The Bahamas.  I am obsessed with the remote islands of the Caribbean.  They are magical.  I recommend you go to at least one small/remote island if you ever get the chance.  This year was one of my favorites.

 Our vacation


In May, we announced we were moving back to Texas and we bought a house!  New Orleans was great to us but we were ready to be back to Texas and be closer to our families.

This is when all the DIY posts started.  My main focus for the first 4 months after moving was getting the house updated and getting settled.  I started working on growing my blog audience and using it to grow my business in the Houston/Galveston area.  Even though Fisherman's Wife Furniture wasn't a new business, it was like starting over when we moved.  I had no word of mouth advertisement or client base.  It was important that I establish a local following on the blog and other social networks.

Slowly but surely I started getting more readers and followers on the blog as well as on Facebook and Pinterest.  I also started getting local requests for work.  Then other bloggers started to feature my projects and my business.  I never thought anything like that would ever happen.  Every feature is a blessing and is unbelievable.  If you missed any of them, visit my "Featured" page which is the top right tab of the blog.

I announced in yesterday's post that I will have my first magazine feature in May!  It will be in the Better Homes and Gardens Kitchen + Bath Makeover Magazine, Summer 2014.  I am still in shock.  It probably won't feel real until I see it in print and even then,  it is going to be strange to see myself and my home in a magazine.

The kitchen has received a lot of attention and is by far our hardest project to date.  It is also the one I am most proud of.  Everything in this space is us.  All colors, textiles and design elements were chosen by us and we DIYed the entire space.  I am so in love with it and can't wait to work our magic on our scary bathrooms.

 Read about the kitchen reveal here.


Favorite Furniture Makeovers


Custom Dresser B&A - One of the most popular posts on the blog!  I love this transformation.


And lastly, one of my favorite furniture makeovers lives in my house!  The armoire I turned into a storage and feeding station for Jaxson and Sabine.  We use this piece of furniture twice a day and I can't imagine what we would do without it.  


Top 3 DIY Posts


DIY Butcherblock Countertops


 DIY Refrigerator Enclosure


http://fishermanswifefurniture.blogspot.com/2013/08/diy-refrigerator-enclosure.html


DIY Glass Tile Backsplash


http://fishermanswifefurniture.blogspot.com/2013/10/glass-tile-backsplash.html


And last but not least, the funniest post from this year is...

Let's Talk Lights

Be sure to check it out if you have never read the post before.  It will change your life.


I hope everyone has a safe, fun New Year's Eve and an amazing 2014!  I can't wait to see what 2014 holds for us and for Fisherman's Wife Furniture.


 photo Signature_zps5473e161.png
 photo googleplustitanium_zps7c045137.png  photo rsstitanium_zps86d5562c.png  photo emailtitanium_zpsf8419ff0.png

Thursday, October 10, 2013

Kitchen Reveal

UPDATE:  Click here to see the most recent pictures of the kitchen.


Hi, y'all!  Reveal day is here!  Finally!


A few before pics and reminders of what we wanted to change:


And now this is what it looks like.


I still can't believe it.  It turned out so beautiful.  All the hard work paid off.  I never thought I would ever have such an amazing kitchen to work in.   


Here are links to progress pictures and product details:


Hinges and Knobs (sink and faucet info is in this post)

Countertops  (DIY Tutorial is HERE)


Tile was purchased at The Flooring Design Center in Beaumont, TX.  This brand must be purchased through a dealer.  Just email the company for a dealer near you.  

WARNING:  This was not cheap tile. It fit into our budget but wasn't a bargain purchase.
      
           Brand: SOHO Studio
           Color: Natural White Polished
           Size: 4 x12


MISC Kitchen Posts:


Flooring - This is the only thing we did not DIY.  
                 MetroFlor Konecto Engage in Woodland Oak was installed by Floors for Living.  
                 Contact Chris Cagle at (281)-356-6706.  


If anyone has any questions, feel free to ask.  Thanks to everyone who have been following the transformation of our home for the support and words of encouragement.  Thanks to my parents and my in-laws for helping with some projects.  Thank you to BLittle, my husband, for being patient with me on the bad days (and the good) and for helping me on projects even though you weren't sure about them.  And thank you to my "therapist", best friend, and sister from another mister, Jessica, for talking me off the ledge a few times.


SHARING AT:

Savvy Southern Style

Between Naps on the Porch

Work It Wednesday


A Stroll Thru Life
Kitchen Table Art

MinettesMazeDIY Show Off


Thursday, October 3, 2013

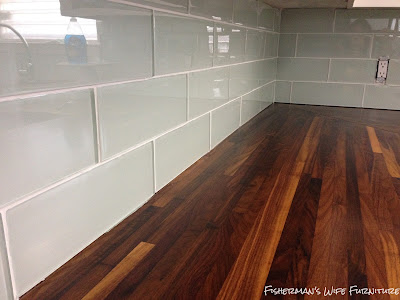
Glass Tile Backsplash

Hi all!  I can't believe it is already Thursday.  This week has flown by.

I finished up our tile this week.  Tiling is a lot like painting....many stages and waiting for things to dry. I am not going to write a tutorial on tile because there are so many amazing ones out there on the blogosphere and I don't think I can write a better one.  My favorite tutorial is from Pretty Handy Girl.  She even posted a video.  Check out Part 1 here and Part 2 here.

I am going to tell you a few things I did that wasn't on a tutorial or I figured out as I went.  This was my first time to tile so I learned a lot!


  • Glass tile MUST have a glass certified tile blade
We rented a wet saw and I asked the guys at the store what kind of blade it had.  They all assured me it would cut glass even though it wasn't a "glass tile blade".  They had some name for the the blade I had not heard of and said it was the best.  Alrighty, I guess they know what they are talking about.  Well....they don't.  At least not with this.  We used a the sample tile to test it and the blade tried to eat my expensive tile.  Of course the rental store closed at noon on Saturdays and was closed by the time we tested the tile.  We went to HD and Lowes and neither one of them had a 10 in glass blade for the saw so we were stuck.  To make a long, dramatic story short, we ended up buying a wet saw.  It was about $50/day to rent a saw and on that day the rental was useless.  Even if we found a glass blade for it we would need it for a few more days just for the backsplash project.  A small new one at HD was $130 and they had a glass certified blade for it.  We will be tiling our bathrooms over the next year so we felt it was a good investment compared to renting.  Here is the one we bought.


It worked great!  Its small so its easy to store and move around.  If you have several tiling projects in the future, I recommend you consider buying instead of renting.  For us it was the cheaper option.


  • Tiling is messy....really messy
Everyone says its messy but they don't really say more.  I will.  It has been the messiest project so far.  Worse than sanding dust being every where.  Thin set is a wet paste and drops off the wall or tools sometimes.  If you get thin set on your hands it then gets on the tile.  Glass tiles coming off of the saw are wet and have to be wiped off or they drop dirty water through the house.  Grout is a whole new level of messy.  You wipe this stuff all over, then wipe it off with damp sponges.  I protected my countertops with plastic first.  I tape the plastic along the wall where the tile was being installed and let it fall over the cabinets to protect everything.  Then I cut up moving boxes and laid them over the plastic.  I also recommend putting plastic or cardboard on your floor.  We went through tons of rags and paper towels last week!  MESSY.  Since I had the boxes and plastic clean up was really easy but know that you will have a huge mess on your hands during tiling.

  • Thin Set
Your thin set depends on your tile so ask a pro or research about what kind you need.  When applying less is more.  Our tiles are 4 x 12 and I read in several places that since they are so big they should be back buttered (put thin set on the back of the tile).  Several tutorials said they should be back buttered and thin set put on the wall.  I did both (wall and back butter) and I think it was too much.  Thin set was wanting to push through to the grout lines and it made it hard to level and even out the tiles.  I think next time I will just back butter or go with a smaller trowel.

  • Grout
Do not mix the whole box!!!!!  I mixed a little at a time.  With grout you apply it, let it set for 10 - 20 minutes, then you start wiping off.  Keep that in mind when you start mixing your grout.  Only mix as much as you think you can work with in that time frame.  Also, you probably don't need the whole box.   I maybe used 1/4 of the box for the entire kitchen.  I sealed up the left over and stored it for a future project.  

  • Plan
Be sure you plan ahead!!!  Be sure you have enough tile.  Be sure you watch videos to know how to cut around outlets and windows.  Be sure you know how to prep your wall.  Be sure you have several days set aside for the project.  Be sure to protect your countertops and floors.  Be sure you have all supplies ready.

  • The right state of mind
This is important with any DIY project.  Know going into it that the final product will not be perfect.  Thing is, if you paid a pro to do it, it still wouldn't be perfect.  You just don't always see imperfections at first when someone else does the project.  When you DIY something, you are usually aware of every imperfection.  Every DIYer experiences this and knows its kind of a curse.  Most of the time the imperfections fade when you look at the space but sometimes they don't.  Just keep the right state of mind that you are doing your best, you are saving TONS of money, most imperfections will not be seen by people visiting your house, and you can proudly say, you installed the tile yourself.  Always remember to be patient (I struggle with this) and that there are going to be bumps in the road.


I am glad we DIYed this project.  It saved a lot of money and it was good practice for the bigger tiling projects that will happen in the bathrooms.

This can be a project you do by yourself but it is nice to have a second person cutting tiles and/or cleaning up behind you. Blittle was the designated tile cutter.  He was better at using the saw than I was.  I marked tiles to be cut and he would go back and forth from the kitchen to the saw and back.  It was a good system for us and kept things moving .

Now for the part you all are waiting for.  The pictures!

Before:  White laminate counters that flowed up the wall to make a white laminate backsplash.


 During:

This is what it looked like behind the laminate backsplash.


I cleaned off any extra glue and bumps off the wall then primed wall.  I primed to keep any previous paint color or glue from seeping through and staining the back of my tile.  


New window stool and trim added.  Tile laid out and ready for install.


 My grout supplies.


Post grout.  Pre caulk.


Pull tape before the caulk dries.


After:


Click here to see all the before and after pictures of the kitchen.